


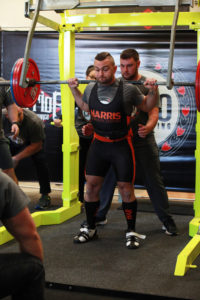
We all want to know how to improve your squat, right?
You arrive at the gym and and are ready to try out squatting again.
This week is the week that you are finally going to start and commit the time to building that booty or you are sick of people saying you look like an upside down triangle. Last time you squatted it was a bit of a disaster and you couldn’t help but still feel that twinge of embarrassment from when you had to ditch the bar behind you because it was too heavy.
You do a few body weight squats and you are ready to start except there is just one problem. You actually not sure where to start.
- The bar seems to be sitting so high on your neck it hurts
- Your shoulders don’t really seem to be in the right position and go to sleep after a few reps
- You try and go “ass to grass” and it ends up looking more like a knee bend
You try for 10 more minutes and just seem to accept that squats maybe are not for me – Leg press seems so much easier.
There is a solution to this problem thankfully and all it requires is to have a plan and look at some key areas that may help you achieve your goal of knowing how to improve your squat.
Technique
Technique comes first for me in the squats as this is the foundation on which your house of squat will be built. If your squat feels like shit or has not improved for months then you may be a perfect candidate to go back to lifting school and make sure you are covering all of these technique cues.
“Screwing Your Feet Out”
This cue is that one that will allow you to engage your glutes when you squat (the maximus and medius to be exact). One of the ways I like to explain this cue is imagine there is a bug on the floor. You stomp on it and then try to screw your foot outwards to really smoosh him into the floor. This should feel like a isometric (no movement) hold as your foot is planted when you are doing this cue.
“Big air and brace”
Imagine you are in a room, a really small room and this room is about to fill completely with air. You are going to have to take a breath that will sustain your life for five minutes so you will want to get in as much air as possible. Once you have taken this breath I want you to imaging that I am going to punch you in the guts so are going to want to brace your abs right?
Now you have this air and brace you are allowed to squat and can only let any air out once you have gone down and up in the squat. Without getting into the technical aspects this is one of the most important concepts of turning the squat from a uncontrolled floppy mess into one where every muscle is switched and you are able to squat in a controlled manner.
“Chest Up”
There is an imaginary ball that is balanced on where your two collar bones meet in the middle and below your chin. Firstly when you come up from the squat you are imagining that you are leading with that ball that is on your chest. This allows you not to let your hips shoot up first in the squat. Second reason for the imaginary ball is that as you come up for the squat you can not let you your chest drop down as the ball will fall off. Even worse in real life you would have lost the position of the upper back which will make the squat even harder.
Progression
Sometimes we tend to push ourselves to fast and there is something to be said for enjoying the journey and respecting the steps along the way. Squatting is no different and the time you take to go through each step in the squat progression is time well spent.
Look at each progression as a way to practice and perfect the skills needed to have a good squat that can keep improving. Even better you can look at the exercises below as ways to practice some of the effective cues that we discussed earlier in the article.
Split Squat
The “hell squat” as it is know by some of my clients is the first rung in our ladder of squat heaven and it should not be missed. The split squat allow you to develop flexibility, strength and balance while making it even harder by only using one leg.
You will find that all of our cues such as “screw your feet out” , “Big air and brace” and “Chest Up” still apply to this exercise. Below is a video where you can starting points and progressions for our split squat.
Box Squat
Once you have learned and mastered the split squat which can take any where from 2-6 weeks in most cases. It is now time to become aquanted with the “box squat” which will teach you control, tension and flexibility.
The key role that the “box squat” plays for me is that it allows you to layer more techniques and expands your control of your squat in a different position. In the following video I explain how the squat can be used to practice the skill of hitting depth and doing so under control. Our earlier work on the squat and the cues that we used are not be forgotten as we are only adding it – like an onion we have layers
Barbell Back Squat
If you have taken all of the steps previously once you go to squat it becomes much easier and there is no guess work. You have had a chance to nail your technique and have created a experience that your body is comfortable with.
One tips that I will give you though is to take advantage of is to add a slight pause at the bottom of each squat. If you add the pause at the bottom as a beginner you will become very comfortable with the uncomfortable feeling of being in the “hole”.

Programming 101
It would be remiss of me not to mention programming when it comes to a discussion on improving your squat. I still stand by the fact that a lot of people could probably just spend time improving their squat form rather than needing special programming.
A theory that I want to introduce first is one that basically sums up life itself, it is that important. From a fantastic old white guy Hans Selye come the theory of “General Adaption Syndrome” – “the body goes through a specific set of responses (short-term) and adaptions (longer-term) after being exposed to an external stressor”. This theory is overarching for life itself be it study, learning a new skill or for us improving our squat.
Lets look at two concepts which will allow us to make course corrections on our programming for the future and beyond.
Training Stress Continuum
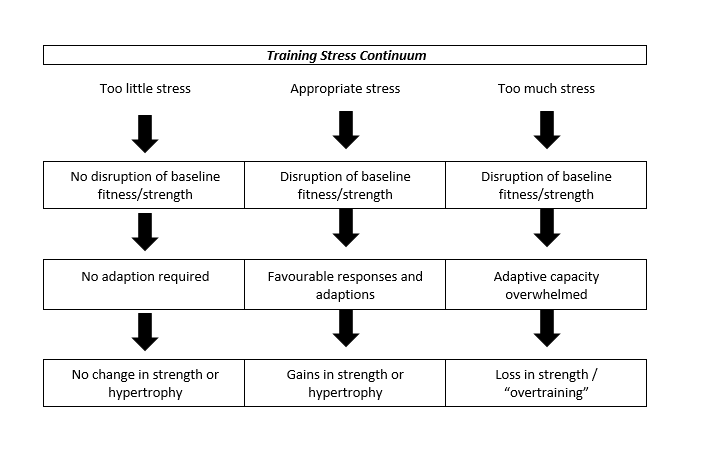
Courtesy of “Practical Programming”- Rippetoe & Kilgore
In the figure above we got to see a way to conceptualize what is actually happening when we are doing reps and sets of the squat.
- To little weight and too little sets and no gainz
- An appropriate amount of weight with sets and reps at that weight good progress
- Too much weight with a amount of sets and reps that far exceed your training readiness – Death (jokes just overtraining)
Periodisation
First with an analogy if I was a 100m runner it would make no sense that I was in top olympic condition at every point of the year. If I was smart I would build myself up at points, test out my new speed and even max out a few times per year to see my full progress.
Here is table of what this would look like
![]()
Volume = Sets x Reps x Weight Lifted
Intensity = A % of your 1 Repetition Max
While it may seem complicated at the beginning it only means that you have to commit to planning things out in advance and then achieving your goal. This is something that cannot hurt your progress in lifting in general.
Conclusion
Learning how to improve your squat can be one of the most enjoyable and productive ways to spend your time in the gym and are one of your big rock exercises. That said it is important to take the time and make sure that your technique is on point and you have gone through progressions that lead to the squat. Once these are mastered some simple programming that is progressive in nature and you are well on your way to improving your squat.